Imagine if you could varnish a watercolour like an acrylic or oil painting and frame it without a mat or glass. The appeal is great — no more glare, no more cracked or broken glass, lighter to transport, and easier to store. The good news: There are now a number of new products to help you. The bad news: This is an experimental and somewhat controversial process.
There are artists in the genre who claim that a varnished watercolour is no longer a watercolour. We call it an ‘encapsulated watercolour.’ Some artists have found that their encapsulated watercolours sell well. For your reference, here are some of the suggestions we have heard about. You can conduct your own experiments and decide how you want your watercolours presented.
Varnish a Watercolour: 3 methods
Remember to photograph all artwork before varnishing or it may show a reflective sheen.
We offer three methods to varnish a watercolour
Process I: Wax the surface!
Here is a method that is quick and easy: Mount a waxed watercolour on a birch board. Watch the video above, which is well-presented.
Process II: Isolation coat and acrylic varnish
1. Varnished Watercolour paper needs firm support.
The goal of varnishing is so the painting, like an oil or acrylic, can sit in a frame without glass or mats. There are several suitable choices:
- Paint watercolour on rigid support. A number of modern acrylic grounds can be applied to canvas or wood panels, allowing the surfaces to accept and hold watercolours. Examples include Golden Qor Grounds, Daniel Smith Grounds or Schmincke Grounds.
- Purchase watercolour paper mounted on board like the Canson Plein Art Art Panels.
- Watercolour paper can be directly mounted onto birch panels using Golden Soft Gel as the glue. Gels are ideal adhesives. They are non-yellowing, non-cracking and durable.
2. Use an isolation coat and MSA varnish
Apply varnish and isolation coats with an airbrush. Any airbrush will work, using a wide spray pattern. Aztec Single Action Airbrush kits come with compressed air in cans and are easy for novices to use. Adjust the air compressor to 35 to 45 psi. Note: Always wear a chemical spray mask while varnishing, and mount an exhaust fan in a window. Keep the airbrush about 6-8″ away from the original. Let each coat dry thoroughly at least 1/2 hour.
Apply an isolation coat. Its purpose is to seal the watercolour so that subsequent varnishing does not disturb your painting. Take care not to smudge or mark the work at this stage. Spray two coats of Golden GAC 500 diluted with Golden Airbrush Medium. Golden also makes Isolation Coat. This will protect the original watercolour. These layers act like an acrylic sealer, keeping the varnish from touching the original. It also makes it possible to later remove the varnish if needed.
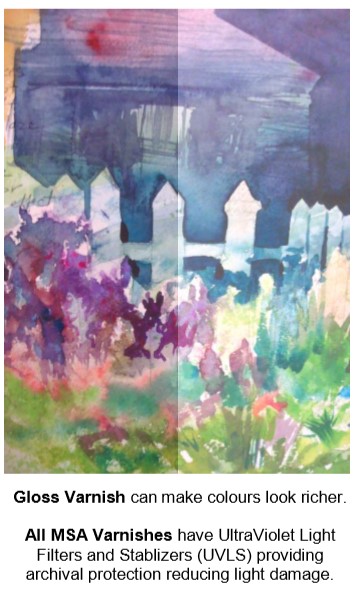
Varnish the watercolour. Golden Polymer Varnish UVLS is a concentrated, water-based varnish (available in gloss, satin, or matte). It should be mixed 50/50 with the Golden Airbrush Extender to run more smoothly through the airbrush. UVLS stands for ‘ultraviolet light stabilizer,’ which will help protect your watercolour from fading. Ideally, you should use 6 to 8 coats of the final varnish. Let each coat dry thoroughly. Because the polymer varnish requires extra care and may permanently bond with the GAC 500 (which is also water-based), Golden MSA (Mineral Solvent Acrylic) Varnish is preferred by some artists. It is easier to remove from the acrylic isolation coat using artist-quality painting solvent.
Process III: If you don’t have an airbrush
If you do not have an airbrush, Golden MSA Varnish can be purchased in aerosol format. It is a solvent formula and must be used in a well-ventilated area. Simply apply 8 to 10 coats to your rigidly mounted watercolour and you will be able to frame it without using glass. Another popular use for the versatile MSA Spray Varnish Varnish is protecting prints, laser prints, inkjet copies, and other reproductions.
WARNING: Don’t rush the coats of varnish. The mounted paper can become too damp and it will bubble or warp. Let each coat dry for at least a 1/2 hour. Humidity is a factor. Touch the paper, and if it is cold or cool let it continue to dry. (Another note of caution for painters who scrub out areas and damage the paper: this can really show up when you varnish, especially in dark areas of the painting.)
Allow the varnish to dry and cure overnight before framing.
Here is a link to the detailed instructions provided by Golden Artist Colours.
More tips for watercolour
- Watercolour Gouache Comparison
- Watercolour Masking Fluid
- Watercolour Pans vs Tubes
- Watercolour 12 School Projects
_________________________
Kim Fjordbotten: As the owner of The Paint Spot, Kim Fjordbotten is passionate about helping artists use materials and make art. She is available as a speaker and educator for teachers and art associations. The Paint Spot offers exhibitions, classes, and beautiful art materials to inspire your creativity.
Notice you are not bombarded with advertising while sourcing this information. Please help us by purchasing your art supplies from The Paint Spot. We really appreciate your business and it means we can keep making educational posts for free. Thank you.