About oil and acrylics brushes
As with watercolour brushes, oil and acrylic brushes fall into the categories of natural or synthetic. As a rule, oil brushes are natural and acrylic brushes synthetic. Brush hair snap and spring are important for both oil and acrylic brushes: brushes should have the ability to move responsively in order to convey the energy of your hand. They should spring back to their original shape after each stroke.
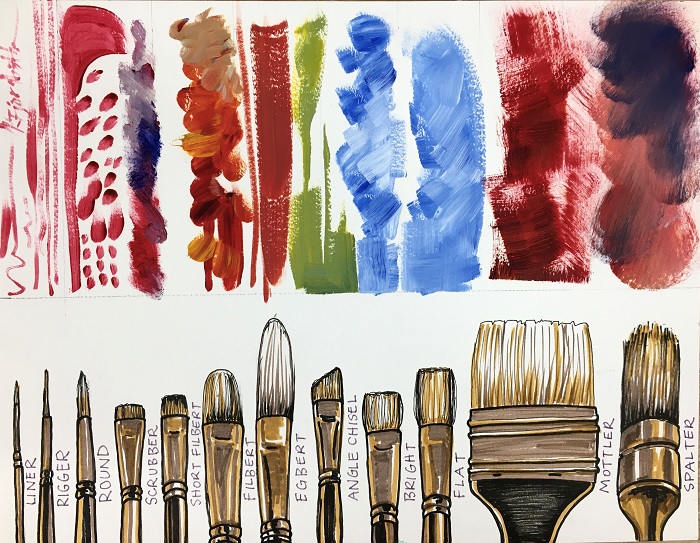
Oil and acrylic brush shapes
Both oil and acrylic brushes have longer handles than watercolour brushes usually have, enabling the painter to work at a distance from the canvas, holding the brush horizontally to the vertical canvas. There are six predominant shapes for oil and acrylic brushes, and a very serviceable range of sizes.
- Rounds
Rounds are great for long lines. They have ferrule and staggered bristle lengths. Try rolling a round while making a brushstroke. Many painters use rounds for details while varying their brushwork overall with flats and brights. - Flats
This style of brush has flat ferrule, and long squared-off heads. They make long fluid strokes, which make them great for creating a sharp edge. Their longer heads hold a larger load of paint for laying out larger areas. - Brights
Brights have short, flat bristles forming a square-shaped head, which makes them suitable for controlled detailing and making sharp edges. Being shorter and stiffer than flats, they are suitable for short marks of thick paint. - Filberts
Filberts are much like flats, but with rounded corners for making softened strokes with blended edges. - Fans
Fans have fanned-out flat bristles, made for blending and softening brushstrokes, or for creating grass effects. - Liners
Watercolour liners are used for acrylics and oil when the paint is thinned.
Check out our extensive line of brushes and painting tools.
Palette knives are for painting and mixing
Finally, don’t forget painting or palette knives, versatile tools used for mixing paint on the palette, which help your oil and acrylic brushes last longer. Use palette knives for scraping off paint, and for applying paint to the canvas. Rather than mixing your paints with brushes, use a palette knife. This practice will go a long way to reduce brush damage as it does not contribute to paint build-up in the heel of the brush head. For the same reason try not to deep-dip your brushes into the paint. Instead, keep the paint on the working end of the brush head. Before they begin painting with acrylic, many artists dip their brush into water to pre-wet the fibres, which helps prevent the acrylic polymer from adhering to the brush fibres.
Oil and acrylic brush hairs
Hog bristle is still the basic brush material for most oil painting, partly because of its unique ability to leave visible brush marks, which desired by many artists. Hog bristle is relatively economical while the range of quality is quite wide. The best bristle hairs generally come from China. The best bristles are bleached, interlocked, (inward-curved), and wellflagged to hold more paint. Artists can identify an economy bristle by its straight hairs and lack of flagging. Cleaning bristle brushes can be somewhat difficult, because bristles tend to absorb water and can soon become swollen and distorted, with the result that the brush just won’t have the same shape as when you first bought it.
Sable, badger, and ox hair (aka Sabeline) find favour for detailed and portrait painting in oil. These are softer but responsive hairs and generally don’t leave brush strokes in the paint. Also, there are some excellent synthetics, such as Interlon, well-suited for oil painting.
Synthetics are the preference of acrylic painters. Synthetics retain their shape much longer than bristle. Unlike bristle, they are not affected by the water in acrylic paints or water-soluble oil paints. Synthetic brushes employ a variety of materials in their making. Check each individual brush for flexibility, capacity, and price before choosing..
Cleaning oil and acrylic brushes
Use water to clean brushes, but don’t leave them in water or solvent longer than necessary. There are several brands of brush soaps for removing stubborn dried paint from a brush. Master’s Brush Soap, Bristle Magic, and Savvy Soap have proven to work best.
Avoid letting any brush sit tip down in a jar, as the hairs will become misshapen. There are several types of brush washers to hold brushes upside down suspended in a medium, solvent or water. If a synthetic brush becomes bent out of shape, a quick dip in boiling water will usually bring it back to proper form. Bristle brushes are more stubborn.
Acrylic: Mild hand soap and water is all you need to remove fresh paint from your synthetic or natural brushes. If acrylic paint dries on your brush, use a wash of Windex spray to loosen it up. Hand sanitizer, (isopropyl alcohol), for soaking dried acrylic brushes or a rinse for recently used brushes. (Anything you add to your brushes, you should take care to remove them again before using them.)
Oil: There are many ways to clean and care for oil painting brushes. Bristle brushes hold their shape much longer if contact with water can be minimized. Citrus solvents, Gamsol, and walnut oil are recommended. When you use a drying oil like linseed or walnut oil, don’t store the brush with oil residue to hold its shape. The oil will dry hard in a few weeks. Conversely, a residue of non-drying (e.g. mineral oil or cooking oil) should be washed out thoroughly before the next use. Don’t allow non-drying oil to mix with oil paints – your painting may not dry properly.
Here is a helpful discussion:
“My personal method to cleaning my brushes is one that I have used for years. First, brush out any excess paint. Do this onto a piece of scrap canvas or an old terrycloth towel. Take the canvas or cloth and wrap the brush and squeeze any excess starting at the ferrule and through to the tip. This will help get out large bits of paint hiding near the base of the brush hairs. Once the excess paint has been brushed out and squeezed out then get some safflower oil from the grocery store (this is cheaper than the variety you want to use for painting). Dip the brush in the oil and allow it to coat the bristles. Using your scrap canvas or towel, brush the oil-soaked brush out to remove even more paint. Do this a few times until all traces of paint are gone. At this point your brush should be able to handle a soap and water washing without too much effort. I have found that dipping the brush in dishwashing soap and scrubbing the bristles on a surface to really get the soap to penetrate the brush prior to introducing water helps the washing process as the water will naturally be repelled without the addition of soap. Wash the brush several times in soap and water until it is clean. One other little suggestion I would like to offer is that every now and again you may find that your natural bristles are dry and lifeless and an occasional application of hair conditioner can help revive the brush. Doing this repeatedly can cause the brushes to splay and the bristles to separate so it is really recommended only when necessary and be sure to rinse will. “
– Amy McKinnon, Williamsburg Handmade Oil Colors, williamsbergoils.com
Loose ferrules – a problem for all types of brushes
If the ferrule becomes loose (a very common condition in dry Alberta) there are several remedies:
a. If the ferrule is loose enough, pull it off the handle and apply a good adhesive to the end of the handle, then slip the ferrule back on. Epoxy cement is good, or some other water-proof cement. Don’t throw the brush away just because the ferrule is loose.
b. If it is loose enough to annoy you but not enough to be removed, the ferrule can be re-crimped. The Paint Spot has designed and built a tool for this purpose, and you can bring the brush to us for repair. Note: this repair will leave scratches on the metal. It is also noted that a modified pipe cutter does a good job and leaves no visible damage.
c. Sometimes the ferrule can be tightened by returning moisture to the wooden handle that has dried out and shrunk. Try keeping the brush in a moist atmosphere for some time. This seems to be a temporary fix unless you add humidity to the house or studio. Remember, too much soaking can split the ferrule or damage the painted finish.
_________________________
Kim Fjordbotten (June 2020) As the owner of The Paint Spot, Kim Fjordbotten is passionate about helping artists use materials and make art. She is available as a speaker and educator for teachers and art associations. The Paint Spot offers exhibitions, workshops, and beautiful art materials to inspire your creativity.
Notice you are not bombarded with advertising while sourcing this information. Please help us by purchasing your art supplies from The Paint Spot. We really appreciate your business and it means we can keep making educational posts for free. Thank you.