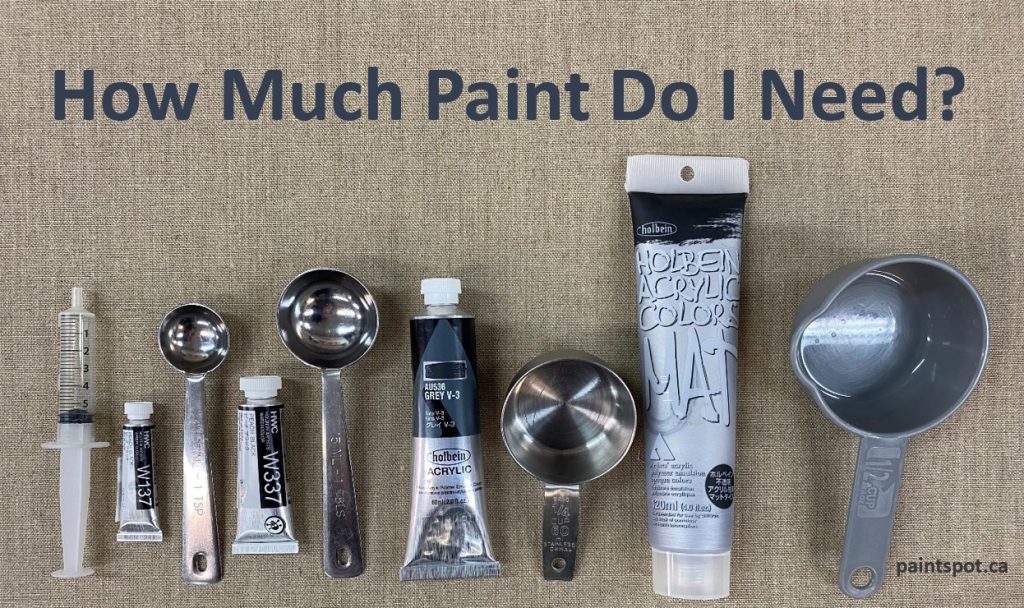
Tips for Acrylic Painters and Mural Artists for Estimating Paint Coverage.
As an artist, you know that calculating how much paint you need for a project is crucial for budgeting and achieving the desired results. Painting large canvases or murals requires a lot of colour, time, and effort, so you don’t want to run out of material mid-project. However, estimating coverage can be challenging, as various factors effect the amount of product needed, such as surface texture, pigment and the number of coats required.
This question comes up frequently and it is crucial to set a budget and manage money. In this post, we’ll share eleven things to consider when estimating paint coverage, along with tips and tricks to help you make the most out of your acrylics.
or figuring out how much canvas you need to stretch on a wood frame.
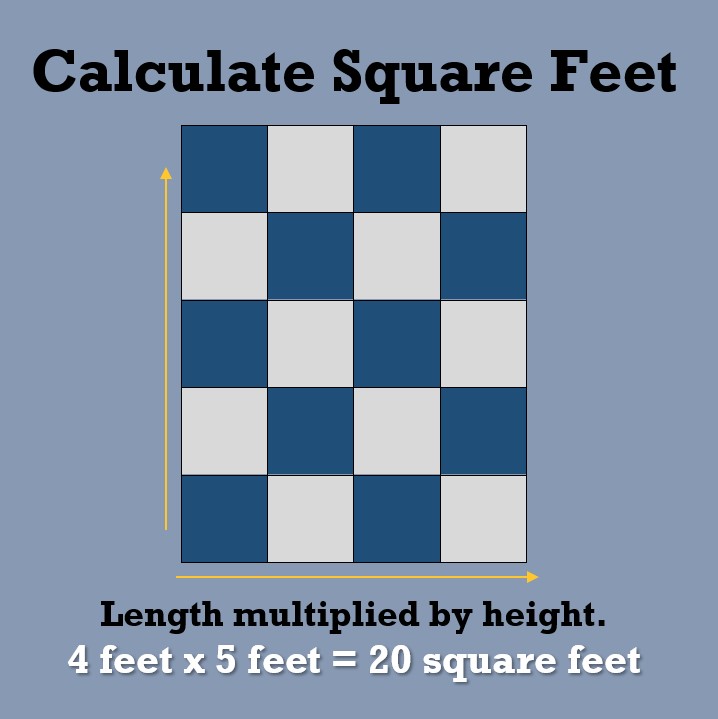
1. Measure the surface area.
The first step is to measure the surface area you plan to paint. You can do this by multiplying the length by the width of the surface. For example, if you have a 4 foot x 5 foot canvas, the surface area would be 20 square feet. Once you know the surface area, you can use it to calculate the amount of paint you need.
2. Determine the coverage.
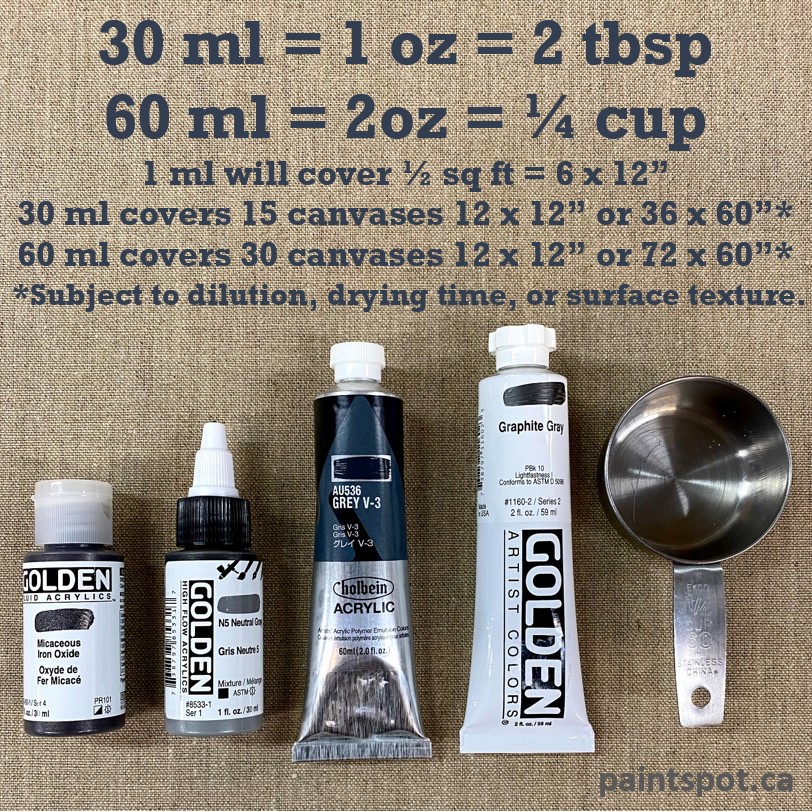
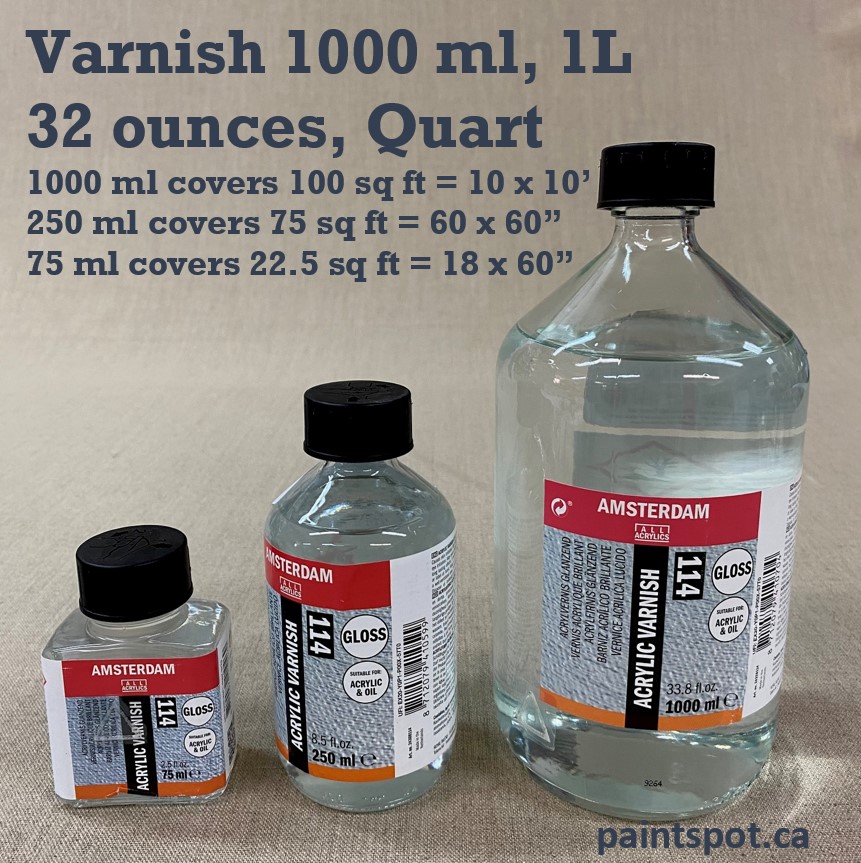
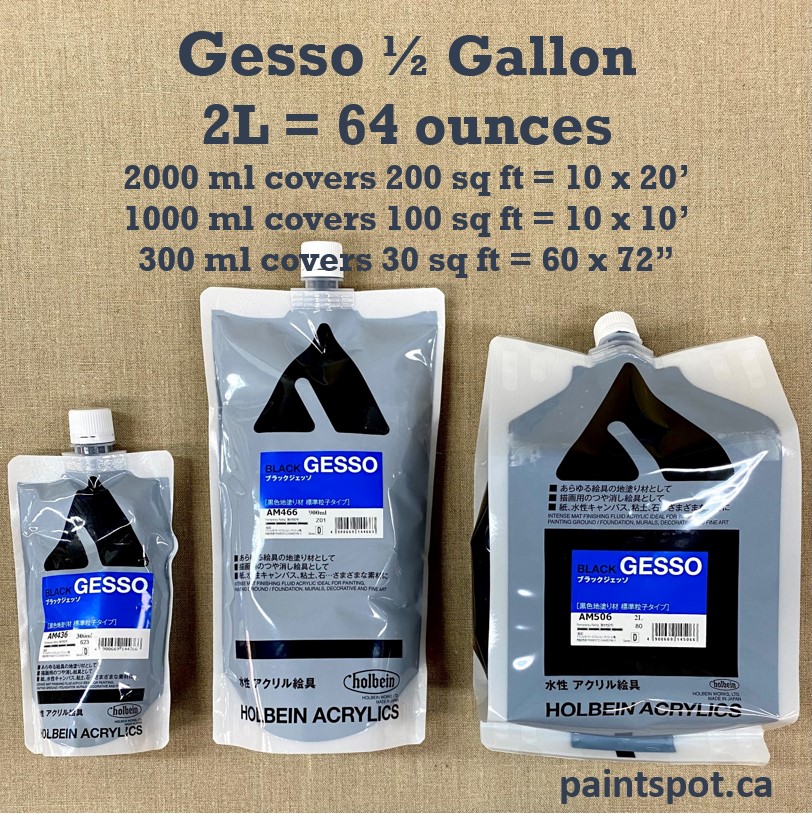
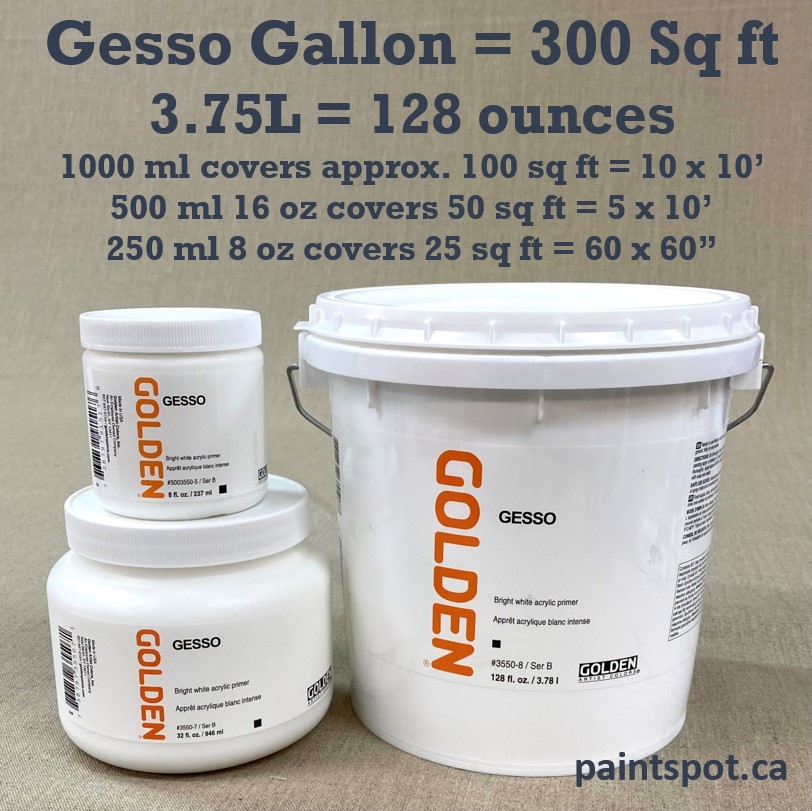
The coverage is the area it can cover with one coat. Whether you are using gesso, acrylic colour or varnish, this chart will prove useful as a general guide. It assumes that 1000 ml (32 oz, 1 L or a Quart) covers 100 square feet. Here is a reference chart we use as a starting point.
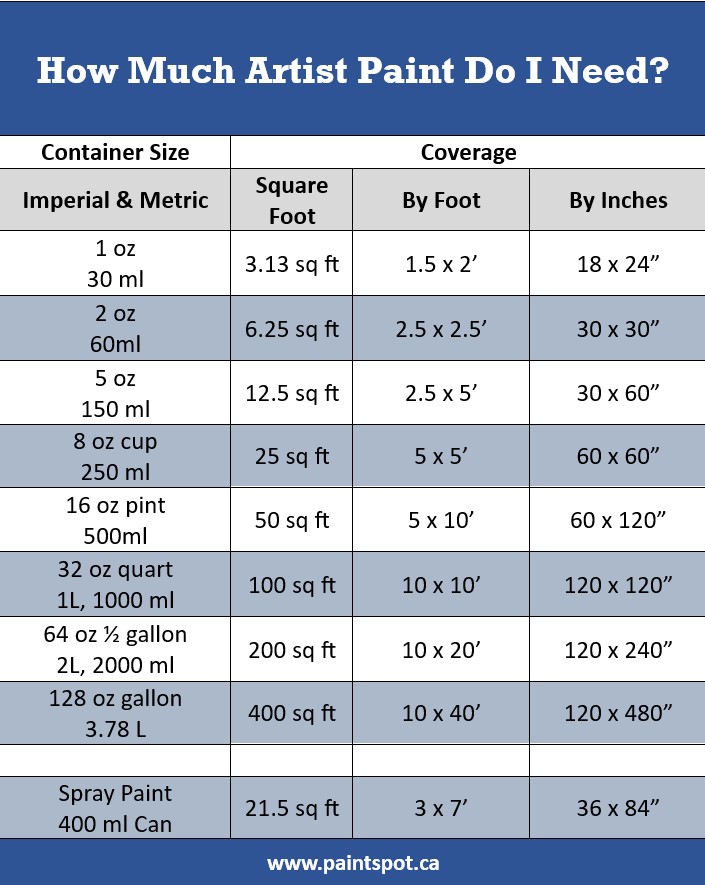
These are tested guides and a great place to start. Your style and painting techniques as well as the surface texture and absorbency will affect how far your acrylics will go.
3. If a flat, solid colour is the desired effect then consider these properties.
Artist Quality vs Student Quality – Quality covers better. Many brands of student paint might provide false economy. It might be ½ the price but you may need to use 3x the amount to achieve the same opacity, so it’s not really a savings. Artist quality means better pigments, richer, deeper, brighter colour and lightfast (meaning less likely to fade over time). Intensity comes from quality pigments. Unfortunately several coats of student paints will not equal the clarity and brightness found in artist quality paints.
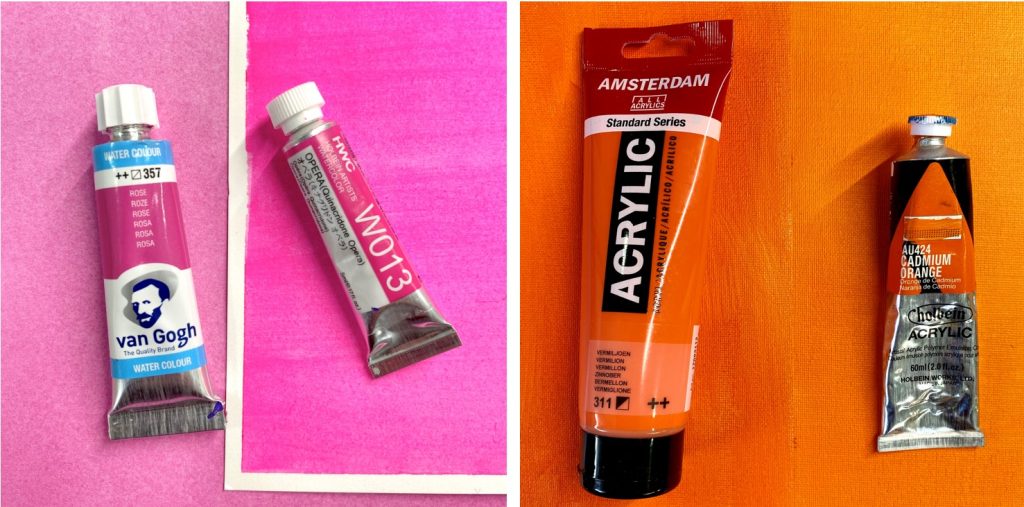
Opaque Pigments – Choose colours made from pigments which are naturally opaque rather than transparent. More opacity = better coverage = fewer layers = less product is used!
Some colours are naturally transparent. Quinacridone Red is a transparent colour. It is an intense cool red when painted thick but when diluted and spread over a surface the white of the canvas is showing through and it looks very magenta. Transparent colours also show more brush strokes.
It is easier and faster to cover a flat even colour using an opaque colour and these paints are generally matte and less shiny than transparent colours. Sheen can be adjusted later in varnishing.
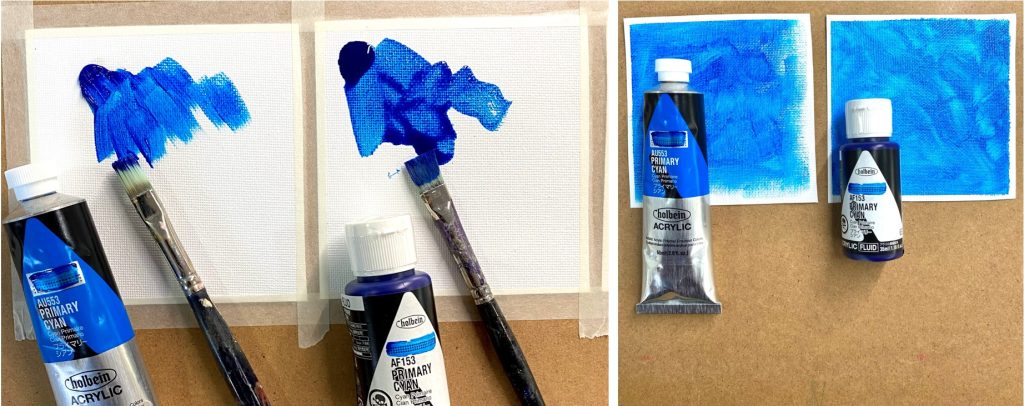
Choose and acrylic designed for flat, solid, smooth colour – We stock two brands of acrylics which are ideal for covering large areas quickly with solid, matte colour. The colours are opaque, and the consistency flows nicely. Both paints level as they dry to create smooth surfaces without visible brush strokes.
4. Fluid goes further than heavy-body acrylics.
Fluid colour flows better than heavy body paint, making it easier to spread evenly over a larger area. For mural painting, we recommend fluid colours rather than heavy-body because they brush out easier.
5. Thin acrylic with mediums (not water).
Artist quality paints, like Golden and Holbein may be diluted up to 20% – 25% without effecting the brilliance of the colour. Do not dilute too much as this may reduce the opacity of the colour and require more coats.
However, don’t just thin paint with water as this will reduce the paint’s adhesion properties and compromise the strength of the dry film and the paint may not bond properly to the wall or canvas surface. Adding medium, or a combination of water and medium, will produce a stronger bond to the surface and make the painting more durable.
GAC 500 Acrylic Medium is one of our most recommended mediums for heavy body and fluid paints because it has a unique balance of film hardness and flexibility, offers a self-levelling working quality, and dries to high gloss film with good clarity/transparency. Let the first coat dry before applying additional layers.
6. Consider the loss due to waste.
It’s essential to factor in waste when estimating coverage. Inevitably, some paint will be wasted due to drying on the palette, brush cleaning, and reworking areas. A general rule of thumb is to add 10% to the total amount of paint required to account for waste. For example, if you calculate you need one quart, add 0.1 quarts (about 3 ounces) to compensate for waste. To minimize waste, use an airtight palette or container to store your paint. When painting outdoors, keep the container out of the sun.
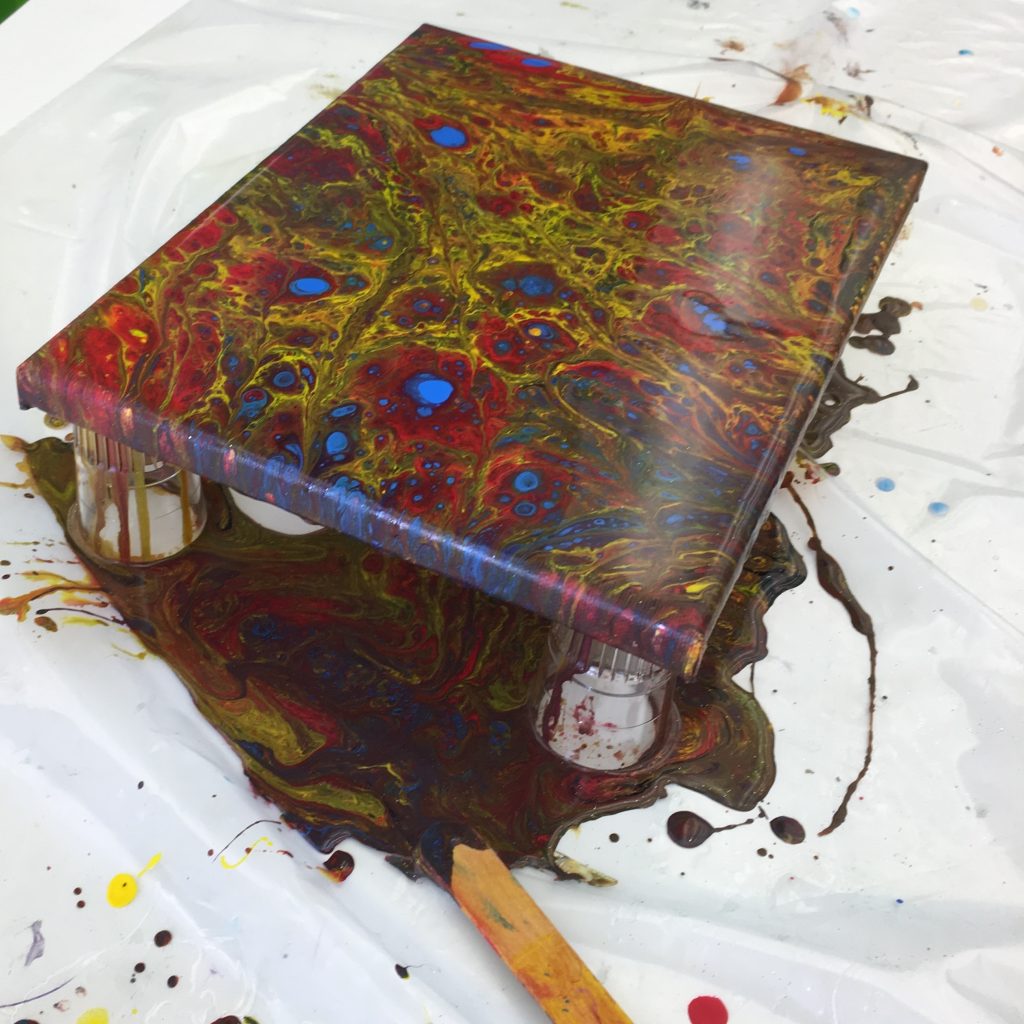
Pouring techniques use a lot of colour.
Paint pouring requires a thick puddle of resinous colour to create flowing designs and cells. Colour must be allowed to slide uninhibited over the edges and on to the table. This means a lot of acrylic might be lost to waste. A frugal, experimental artist might be able to peel these acrylic skins from the plastic table cloth and make some interesting collages by gluing these bits onto a canvas. But another form of waste is not really salvageable. It is called ‘Clingage’, a technical term for the product lost because it clings to the walls of cups and containers. For these reasons, pouring goes through a lot more product than Chart 1.
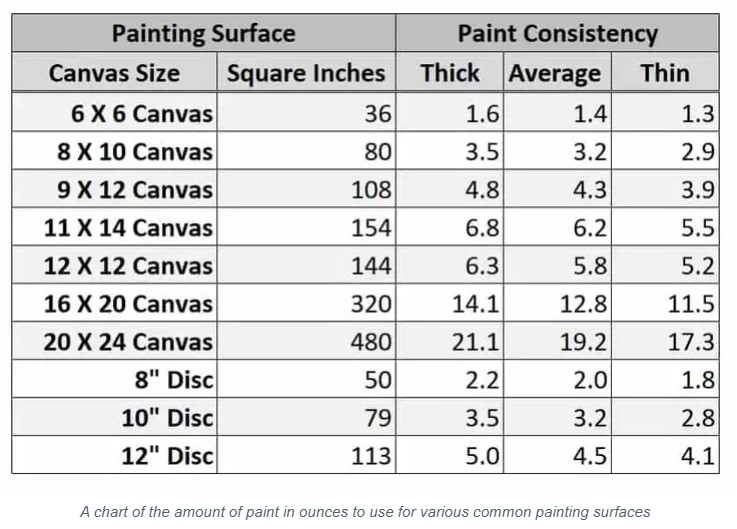
The chart below is popular on the internet. It is a calculation for paint pouring with student quality acrylics. These are the volumes of colour mixed with Flotrol and pouring medium, and the surface area you can expect to cover.
7. Painting Thick Uses a Lot of Paint.
Thick, impasto applications will use almost twice as much as Chart 1, but not quite as much as Chart 2. Remember pigment and colour is the most expensive part of the paint. Yes, we can stretch our colour while making it thicker. Here are two suggestions for adding texture while using less colour.
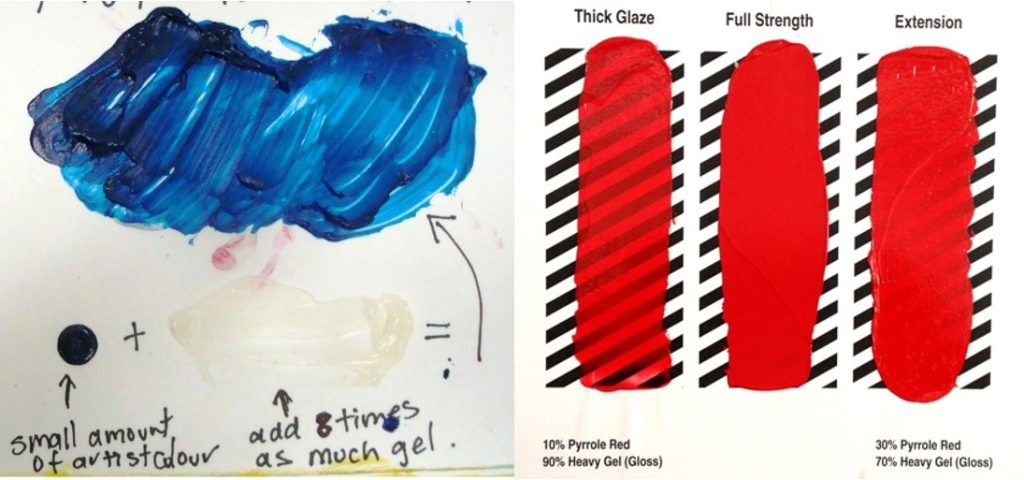
a. Add acrylic gel to thicken and extend the colour.
There are many gels. Regular gel will be most like the consistency of heavy body acrylic in tubes. Visit our shop to see the gel charts to help you decide on a suitable gel. You can choose between shine level and stiffness.
b. Use acrylic modeling paste to build texture first and then paint on top.
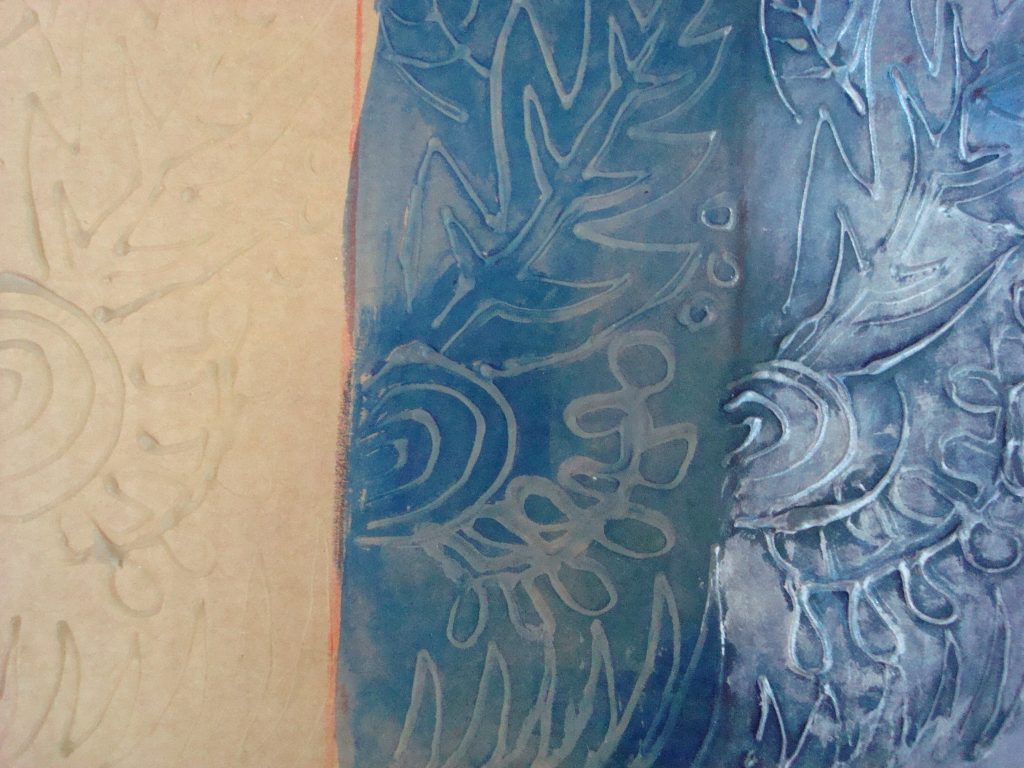
Here’s how create texture without using so much pigment:
- Apply molding paste to sculpt it into the shapes you like.
- Dilute your colour with acrylic medium and water to paint a thin expressive coat on top.
- Let the colour pool into the lower spaces.
- Highlight the texture by dry brushing or dusting light colours on top of the peaks.
8. Keep Acrylics from Drying Too Quickly.
Acrylic dries quickly, so much of the waste comes from colours drying on palettes. Retarder, when added to a paint or medium, can slow down drying and provide more working time. The addition of Retarder should not exceed 15% of the total mixture. If too much Retarder is added, the film may never dry properly and remain sticky. We prefer to recommend Glazing Liquid instead of retarder, because it is easier to control and less likely to become tacky.
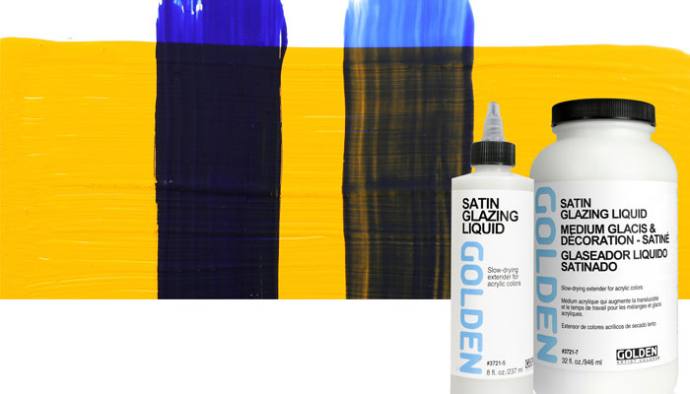
Add Golden Glazing Liquid
This unique acrylic medium will retard the drying time and prevent your paint from drying too quickly. It has an open time of 30 to 45 minutes, depending on humidity. Glazing Liquid will cover 400-2,000 square feet per gallon for typical wall glazes, depending on techniques from brushing to sponging. Obviously the 2,000 square feet is for sponging or very thin applicaitons. Brush or roller applications should not require thinning, but Glazing Liquid may be thinned with up to 20% water if desired. Note Glazing Liquid is not recommended for mural painting. Choose GAC 500 instead (See above).
Experiment to find the maximum amount of medium that can be added without making it too transparent.
Every colour is different.
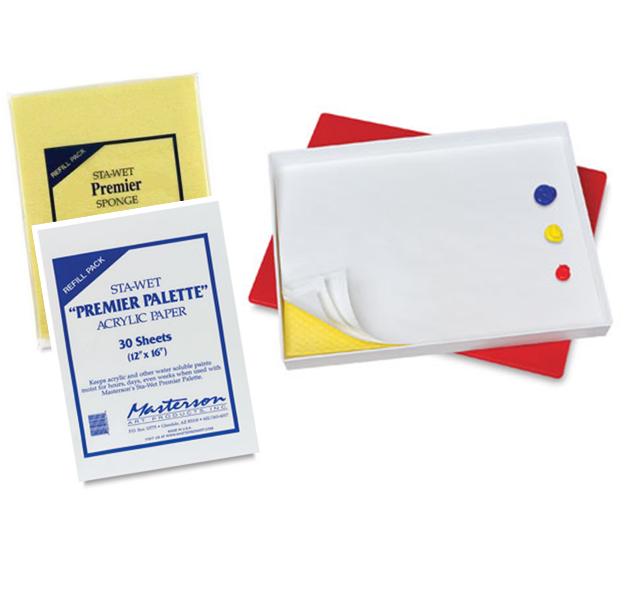
Use a covered palette to keep your paint wet.
One way to avoid waste in acrylic painting to use a covered palette. The family of Sta-Wet palettes are the ideal way to keep paint wet between sessions. The sponge inside holds water to prevent paint from drying for almost two weeks if the palette is sealed.
9. Apply in a painterly effect.
Flat color coverage requires more paint because of thicker application and multiple coats. If you opt for a painterly style, then you can disguise an uneven surface while creating a large field of colour that may appear more interesting than solid colour.
Here’s how:
- Dilute paint with an acrylic medium.
- Use a slow dry medium for less waste.
- Apply colour in feathery brush strokes to lightly cover the surface and let the surface glow through to create visual texture and painterly style.
- Take advantage of the white undercoat. Allow the surface to glow through cleverly. Add highlights without needing to add white.
10. Account for surface texture and absorbency.
Paper absorbs more water than a primed surface. Unprimed canvases and bare wood will suck up much more paint than a primed surface. Gesso is less expensive than other colours, so we recommend applying it as a first coat to seal the canvas, wall, or wood to create the ideal surface for applying paint with a roller or brush.
A smooth surface will require less paint than a rough one. A rough stucco wall has peaks and valleys and nearly twice the surface area compared to a smoothly sanded and primed drywall.
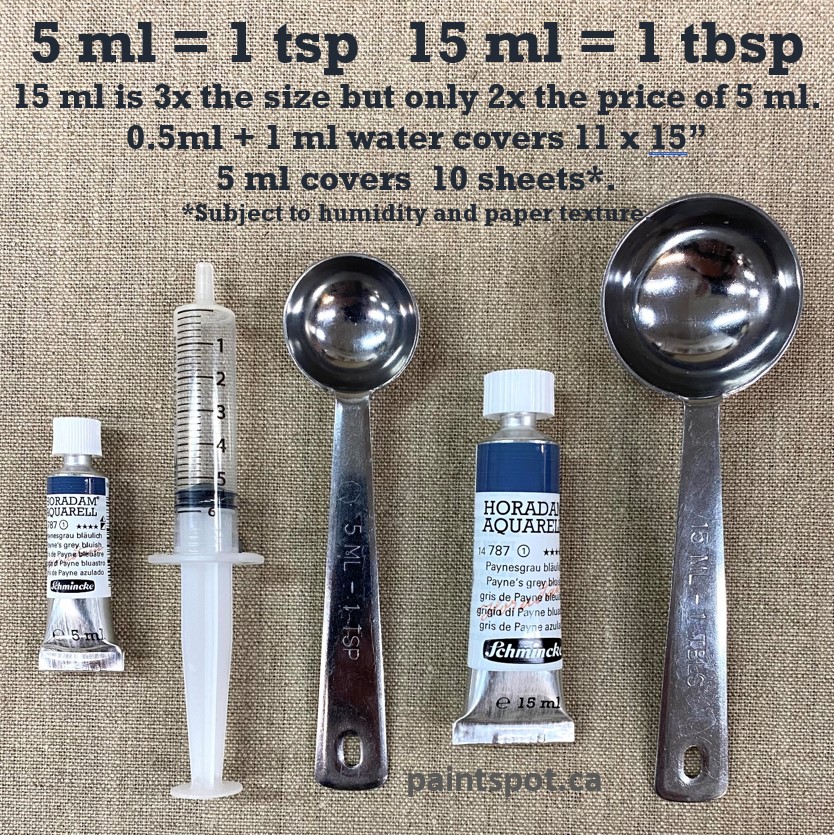
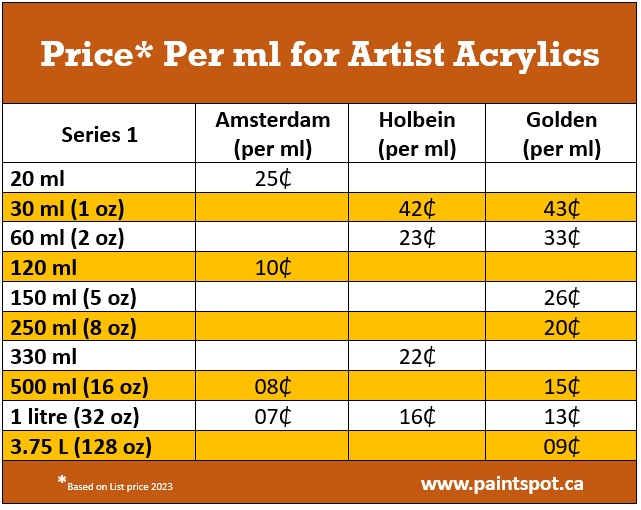
11. Buy colour in larger sizes
When budgeting, is it important to remember that there are savings when buying larger containers. Did you know that tubes are relatively expensive containers? Buying jars is more economical. Here is a break down of price per ml of three acrylic brands based on Series 1 colors. Series 1 colors are generally blacks, whites and earthtones and are the least expensive colors. The chart is based on 2023 prices.
In addition to the savings in large format containers, The Paint Spot offers frequent sales and volume discounts. When you buy in bulk from The Paint Spot there may be additional discounts available. For example: order more than $300 saves you 30% (on one type of artist paint). These discounts are not combinable. Additionally, if you are stocking up for a large project of $1000+, we may be able to quote more aggressively, so please send us an email.
Conclusion:
Estimating coverage can be a daunting task, but with the tips and tricks we’ve shared in this blog post, you’ll be able to calculate the right amount of paint for your next project accurately. Whether you’re an acrylic painter working on large canvases or a mural artist creating a stunning masterpiece, knowing how much material you need will help you budget, reduce waste, and achieve desired results. Remember to consider factors such as surface area, coverage, colour intensity, surface texture, brush/roller quality and waste to make your paint go further. By following these tips, you’ll be able to create beautiful artwork without worrying about running out of product midway through the project.
Happy painting!
Related Topics